Showing posts with label rebuild. Show all posts
Showing posts with label rebuild. Show all posts
Wednesday, February 25, 2015

Saturday, February 21, 2015
Test Flight Successful
Finished the basic build of the quad and was able to get a quick successful test flight in the basement after about 5 hours of messing around with the quad, my radio, and Mission Planner.
Finally worked out all the little issues and had a successful test flight:
- The Deadcat needed to be balanced as it was naturally nose heavy. Moving the battery allowed me to balance the quad.
- I played around with ESC calibration and radio settings for hours because the props kept spinning when I armed the quad. My old APM equipped quad did not do this. Well it turns out that the default for Mission Planner with Pixhawk is to make the blades spin slowly when armed. I did manage to program the ESCs to play tunes when they power on, but that is not much use.
- Turning on the throttle failsafe is a waste of time as it is triggered as soon as you arm the quad, causing the arm function to fail.
- Use loctite on all bolts, the one place that where it was skipped (landing skids), a bolt came loose.
- Need to make up a cheat sheet with the meaning of all Pixhawk and ESC sounds and lights. It is hard to understand failures otherwise.
- Had to reverse all the RC channels except throttle.
- It seems smoother than the last quad as the props are balanced but it is more twitchy on the controls, so will have to do some more tuning.
Thursday, February 19, 2015
Lots of Little Things to Complete the Quadcopter
I am making progress but am now at the stage where there are lots of little things to do to make the quad work.
- Install the flight controller with special vibration reducing foam (see photo 1 below).
- Install the power monitor and battery velcro mounts (see photo 2)
- Calibrate the ESC's. This is always a pain as you have this "one man band" performance where you are plugging the main battery in and out, watching lights on the controller, listening for musical tones and beeps, changing throttle settings, listening for more musical tones. I usually end up doing it 5 or 6 times before it works.
- Calibrate the flight controller - Mission Planner complained a lot until I saw in the fine print that I had to recalibrate the compass due to a special new firmware load. Lots of waving the quad around when you do this calibration.
- Installed camera mount and new camera - looks really good except the new camera wants a special power connector that I do not have. More waiting for parts from Amazon.com.
- Items that remain include installing the final Spektrum receiver and PPM converter, wiring the camera, putting some mechanical pieces on the dead cat frame, installing the new professional looking cover, and then some flight testing in the basement.
 |
| Photo 1 Battery Mount and power monitor |
 |
| Photo 2 Note Green Kyosho vibration absorbing foam |
 |
| Photo 3 New camera that includes a 5.8 GHz video transmitter |
 |
| Photo 4 Overall view of Quadcopter |
Thursday, February 12, 2015
New Quadcopter Build: SK450 Dead Cat
Now that we are back from Florida and parts have arrived, it is time to start the new build. I salvaged whatever I could from the Flying Flowerpot (may it rest in peace). Two motors, the four speed controls, battery, flight control, receiver, and camera were all salvageable. However, I decided to replace some of these parts and to change the configuration of the quadcopter to "Dead Cat" - a non-square quad setup with more room for cameras. See the picture below for the basic setup, not fully assembled.

The other changes that I plan to make are:

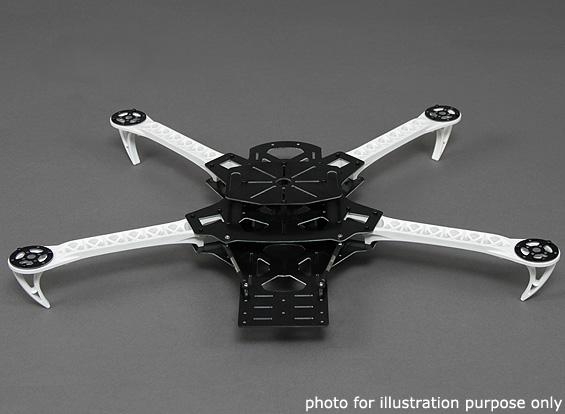
- New flight control system (Pixhawk) with more accurate GPS (LEA-6H). I bought the genuine 3DR versions instead of the Chinese clones to ensure quality. My old APM 2.6 system was a Chinese clone and had limitations and unknown quality.
- New receiver (Spektrum AR610). This receiver is highly regarded compared to the Orange R615X, which has rumors of range issues. New Spektrum DX6i transmitter.
- Use of a PCB as a frame to distribute battery power, bought from Hobbyking.
- Dead Cat configuration using a conversion kit from Hobbyking. I made a mistake and assumed that all I needed was the previously mentioned SK450 Dead Cat PCB, but it turns out that you need this plus the Dead Cat conversion kit.
- Full monitoring of power by the control system. This was included with the Pixhawk.
- A proper cover instead of a flower pot, sourced from Quadrysteria.com.
- Receiver power from the Pixhawk or separate UBEC, not from the ESC's. This should be higher quality power with less interference.
- Use of loctite on all screws to reduce the chance of loosening with vibration.
- Carbon fiber props.
The new control and radio system are shown below.
Wednesday, December 17, 2014
Flying Flowerpot 2.0 -- SK450 Quadcopter Rebuilt
 |
| Flying Flowerpot 2.0 |
I finished the Flying Flowerpot quadcopter rebuild and had a successful basement test flight in the new configuration. Changes since the last blog posting:
- Moved the camera mount again, to the upper level but with a new mounting bracket so the camera is out front between the props.
- Moved the receiver slightly.
- Tidied up the wires.
The following photos show the Flying Flowerpot 2.0:
 |
| Top view, no flower pot |
 |
| Note the receiver attached to top level with double sided foam tape |
 |
| New camera mount |
 |
| Front view |
 |
| Rear View |
Tuesday, December 16, 2014
Rebuilding The Flying Flower Pot Quadcopter - The Six Million Dollar Man
 |
| Partially Rebuilt Flying Flower Pot (Pot removed for clarity) |
First, I got rid of the battery monitoring module, which might be causing problems and I cannot figure out how to use it.

 |
| Rewiring, receiver is on the left |

Broken motor mount
 |
| Break in arm |
 |
| GPS remounted |
 |
| camera mount |
Subscribe to:
Posts (Atom)