Showing posts with label apm. Show all posts

Saturday, June 17, 2017

DJI Phantom 3 Versus Custom Built Camera Drone

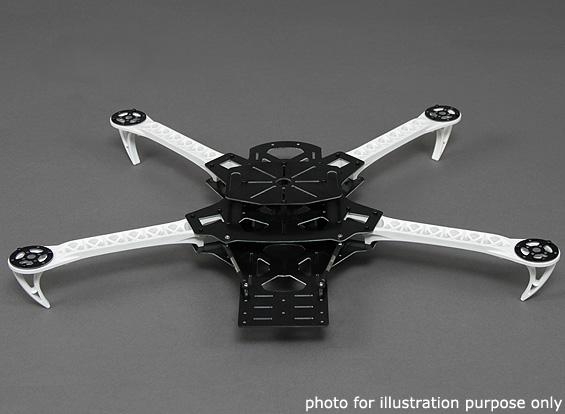
Anyone reading this blog (does anyone read this blog?) would know that I have built quite a few camera drones - SK450, SK450 Deadcat, S500, S500 Hexacopter.  Most of them used commercial frames, APM or Pixhawk controller, and Gopro or similar cameras.  They all worked, some of the time, and I enjoyed building them.

But I was tempted by a very low price on a DJI refurbished Phantom 3 Standard and bought it.  What was it like getting a pre-assembled and integrated drone working?  In short, very good.

I will not do a full review but just highlight the big differences between a home built drone and the DJI.

Debugging - no debugging needed, just follow the instructions, watch a few Youtube videos, update the firmware and it was ready to fly.  Contrast that with hours and hours trying to get a DIY drone working well.

Features - The DJI has more features than my homebuilts, although I could add more.  Specifically, the DJI came out of the box with failsafes, FPV, full camera control from the ground, auto takeoff and land, as well as full OSD (on screen display).

Flying - I guess DJI has a lot of experience with people crashing their drones and complaining.  The Phantom is easier to fly and has a beginner mode to keep you safe.  The auto takeoff and land also prevent a lot of crashes.

Camera - The DJI camera is pretty good, maybe not quite as good as the Gopro Hero line, but acceptable.

Accessories - Good and bad things here.  Accessories like carrying cases, landing gear extensions, and props are readily available at reasonable prices.  DJI batteries are proprietary and expensive.

So all in all a very good experience with DJI Phantom 3 Standard for about $300 USD.  If you are more into flying and photography than building and debugging, I definitely recommend it.

Sunday, February 28, 2016

Quadrysteria Mini Mamba Review


Mini Mamba (Final Version)

A while back, I bought a 250 racer style kit from Quadrysteria called the Mini Mamba.  It is high quality in general, with Sunnysky motors, true carbon fiber frame, SimonK ESCs, etc.  The kit included the frame, motors, ESC, integrated BEC/power distribution card, and instructions.

I initially elected to use a Mobius FPV system, spare mini-APM controller, and Lemon DSMX receiver to complete the build.  I started trying to use the instructions, which are well written, but not very useful.  Unfortunately, there are no pictures and you are left wondering which plate is the top, what is the front, exactly what standoff is required etc.  Fortunately, there are video instructions here, and they show you exactly what to do.

In the initial build, I ran into a few problems, some of my own making.

  1. The mini APM may have been defective, it did not consistently stabilize the unit.
  2. The integrated power board from the kit was defective.  It did not supply proper 5V for the receiver and APM.  I had to replace it with a power distribution board and use one of the ESC BECs.
  3. The wiring for the mini-APM and rest of the electronics was not reliable, probably due to the crummy wiring supplied with the mini APM.  The ESC BEC was probably not the best choice as well.
The Mamba flew, but not well, I did crash it badly enough that I had to repair it.  One of the advantages of the Mamba is that will usually just break the props and/or the nylon bolts that hold the motor mounts to the carbon fiber arms, and this is easy to repair.  Previous quads tended to break arms, props, and frame plates, necessitating major repairs that takes hours and hours.

Based on this experience,  I stripped it down and rebuilt it with an Orange receiver that I had used before, a separate BEC, and a Hobbyking mini APM and Hobbyking GPS.  The wiring was much more straightforward as the Hobbyking units came with better cables and I was using a separate BEC. It takes some work to figure out where to stick the ESCs, cabling, BEC between the top and bottom plates.
Side view
Performance is much better but there is still a lot of tuning required as it is very sensitive to pitch and roll, but very insensitive to throttle.  Some other pictures are shown below.
Arm assembly which is set up for easy repair after crashes
Mobius FPV setup with integrated mount and transmitter.  This will be reviewed in future.

Thursday, January 14, 2016

Converting the Eachine Racer 250 to APM Controller

A while back I wrote about buying the Eachine Racer 250, which used a CC3d controller.  Well I got tired of trying to figure out this controller and decided to switch the controller over to an APM.  I used the Hobbyking Micro APM, but you can get the same hardware from Banggood.

This started out easily enough, but there were a few hurdles along the way.

Step 1 Disassemble the Eachine

Take the top deck and battery alignment plates off as shown in the figure 1.  Be careful when removing the power connector for the 5.8 GHz video transmitter as it can be easily damaged.  Use an old coffee cup to store the parts while you work on the rest of the project.

Figure 1

Step 2 Mount the Micro APM


The Micro APM will easily go into the CC3D mounting standoffs as shown in figure 2.  Note that you will have to remove one standoff that supports the battery alignment plate as it blocks the USB port.  Figure 3 shows the APM mounted from the top
Figure 2
Figure 3

Step 4 Wire Up the APM

Here is where it gets a little tricky.  The servo wiring from the APM to the receiver is done as per normal.  The Ardupilot.com website shows how it needs to be done.  This is easy.

Next, you need to supply power to the APM so you will need to make up a cable that goes from the Eachine 5V and ground power pads (green arrow Figure 4) to the power input connector of your APM (magenta arrow, Figure 4). You will need a 6 pin connector to attach to the APM.

Then, we come to the tricky part.  The connections to the motor speed controls are shown by the red arrow in Figure 4.  You have to make a new cable here.  The motor numbering IS NOT THE SAME for APM and CC3D.  The cable will need to be set up as follows:

APM            Eachine
5V                5V
Gnd              Gnd
Motor 1        Motor 2
Motor 2        Motor 4
Motor 3        Motor 1
Motor 4        Motor 3
Figure 4

Step 5 Reaasemble the Eachine

Now you can reassemble the battery alignment plate, top deck, and secure any loose wires.  You are ready to fly again after the usual ESC calibration, radio, compass, gyro calibration are done.

Figure 5 Reassembled Eachine Racer 250


Friday, December 11, 2015

Eachine Racer 250 - How Does Openpilot Compare to APM/Pixhawk


I saw a good deal on Banggood.com for a small ARF (Almost Ready to Fly) Quad called the Eachine Racer 250 and went ahead and purchased it.  It is a 250 sized unit with the FPV built in, includes a battery, and charger, and cost around $125.  I added a spare Orange DSMX receiver and a Spectrum DX4e transmitter and was up and running!  It sends video to my 5.8 GHz integrated receiver-monitor and works like a charm.  Build quality is good for the price, packaging was good, and it is designed well.  As usual, there are NO INSTRUCTIONS from the Chinese manufacturer in the box and you have to hunt around on the web to find out how to set it up.  I found a few good Youtube videos and they guided me through setup without a problem.

The only thing that was challenging was my lack of knowledge of the flight controller, the CC3D, an open source flight controller that is somewhat different from the APM or Pixhawk.  I again queried the web and found the ground controller for Openpilot, which supports CC3D hardware.  I downloaded the software, installed it, connected USB to the quad, and followed the instructions in the video.

The quad flew, but was very sensitive to control inputs, too much for my flying skill.  I again went to the web, found some tutorials, and tried to fix the settings.  The tutorials were out of date so I went to the wiki, which seems to be permanently down.  I then posted a question on RCgroups.com and got some information.

Unfortunately, there seems to be a schism in the Openpilot community and it has split into three factions: Taulabs, Librepilot, and Openpilot.  While Openpilot works, it does not seem to have as much support as it used to.  The other 2 options seem to be works in progress.  APM and Pixhawk/PX4 are definitely better options if you have a choice.

But I did figure out how to desensitize the quad using the current Openpilot and it flew well in a couple of outdoor test flights.  Stay tuned for more info.


Monday, August 3, 2015

First Successful Quadcopter Autonomous Mission

After all the adjustments to the Deadcat SK450, I took it out to the local "park" (remote muddy field) to try a mission.  It was a simple mission, fly to a few waypoints, circle at one waypoint, return to launch, then land.  It actually worked!  Here is the video:


Thursday, July 30, 2015

Getting Telemetry Working, A Short Review of Excelvan Radio Telemetry Kit 915Mhz

I recently purchased a small Telemetry module from Newegg.com for about $25, it runs on the unlicensed 900 MHz band.  It was quite easy to hook it up to my Hobbyking Micro APM and now I can monitor the Quadcopter while in flight, just as if it was connected to my PC via USB.  No need to connect USB on the ground, as this telemetry connection handles all communications.

A new cable must be made using the supplied telemetry cable from the telemetry module and the one supplied with the APM.  Also remember to connect as follows:
Telemetry Module with black antenna

Telemetry ModuleAPM
5V5V
GndGnd
TXRX
RXTX


The PC connection was also painless, stuck the module into a USB port and the driver loaded automatically onto my Windows 7 laptop.

The only other trick is to select 57.6Kbps in Mission Planner to get the link to work.

Note: Telemetry module is from Excelvan and is called "Radio Telemetry Kit 915Mhz Module for APM APM2.5 2.6 Pixhawk PX4 RC Multicopter Quadcopter" and is available on Newegg.com

Update-Pixhawk Test

I also purchased a unit for use with my Pixhawk-S500 quadcopter covered elsewhere on this blog.  This time, I could use the included cable to connect the telemetry unit to my Pixhawk, although I had to shave a little plastic on the Pixhawk end, as the Pixhawk uses unusual connectors.  As with the APM, I set the rate to 57600 and was connected to Mavlink on the Pixhawk.  Works like a charm.

Monday, July 27, 2015

More Fixes to the SK450

I am plagued by poor loiter on the SK450 and have made further changes to improve things:


  1. Fixed the slop or wobble in the GPS mast.  It turns out that the cheap mounts rely on being able to screw down the knurled flange until the mast mount inside is snug.  However, a lot of them cannot be tightened.  I added a plastic washer from an old prop to the mast as shown and the wobble stopped.
  2. The APM mount was maybe moving in flight, so I remounted it with the special vibration reducing foam rubber and I secured the USB cable better so it could not move the APM.
  3. Added a little foam rubber inside the micro APM case to ensure the barometers were not getting fooled by the prop wash.
  4. Wait 5 minutes after power on to get the GPS and all sensors stable before trying a flight.
  5. Added some practice golf balls to the landing gear so they do not catch in the grass when taking off or landing.
  6. I very carefully recalibrated the accelerometers, making sure that the quad was absolutely level during the first stage of calibration.  This made a HUGE difference versus my previous "it looks level" calibrations - the test flight was much beter with much less yaw and pitch on takeoff and during flight.
  7. Made a stand out of a medium size plastic storage container as shown:

Monday, July 20, 2015

Pixhawk Versus APM Comparison Review

This blog entry compares two flight controllers from the Ardupilot 3DR-Open-Source stream: the generic APM 2.X controller and the Pixhawk.  I am an intermediate multirotor builder and flyer, so this comparison will focus on functionality and useability, not on advanced features.  Also, this review is based on my experience with 5 different APM modules (none sourced from 3DR) in three different physical forms: standard, mini, and micro (also called mini by some) sourced from Hobbyking and generic Chinese manufacturers.  The Pixhawk is available from multiple domestic and Chinese sources and you should check the reviews to make sure you are getting one with decent build quality.  Each was used with corresponding GPS/Compass units from the same manufacturers.  I built three different quadcopters and used them with different controllers.

Feature/CharacteristicGeneric APM 2.X3DR PixhawkComment
Size/WeightSmallLargerAPM is available in 35x35x5 mm board.  Pixhawk is 81x50x16 mm
CostLowHigher, about 4XAPM with GPS ~$65
QualityVariableBetterInspect a generic APM after you get it for poor soldering, loose USB..
SupportGoodGoodThe best support is from peers on DIYdrones and APM forums
Flight StabilityGoodGoodThis is my experience with a well setup APM and Pixhawk, your experience may vary
AccuracyGoodBetterIt does depend on your GPS and its accuracy.  Pixhawk has a more powerful processor and more memory
Onboard indicatorsPoorGoodPixhawk has multiple LEDs and tones to tell you status, APM has a few LEDs
Ease of SetupModerateModerateMore components to interconnect on Pixhawk, but well documented. Cables and connectors often an issue with APM and documentation must be found on the Internet.
Ability to fly autonomous missionsYesYes
Mission Planner Ground Station CompatibilityYesYes
Flight logging CapabilityGoodBetterPixhawk logs more information and has a microSD for storage. APM has limited storage of most important variables.
UpgradeabilityNoneYesAPM code is now frozen to my knowledge, but Pixhawk software with improvements still being released
Debugging difficultyGoodMore difficultAPMs seem to always work, Pixhawk is more finicky about ESCs, setup, etc.

Overall, both controllers are excellent and have worked well for me.  The APM is a better fit for small quadcopters and is probably better for the beginner builder due to its simpler setup and low cost.  The Pixhawk is very good but it takes more time to set up and it is likely higher quality and performance, so it works well in larger camera quadcopters and similar expensive vehicles.

APM equipped SK450 "Dead Cat" Quadcopter
S500 Quadcopter with Pixhawk

Saturday, July 11, 2015

Don't Try Auto if You Cannot Loiter

Learned a new lesson yesterday, should not have needed to learn it, because it is obvious.

If your quadcopter cannot LOITER successfully, don't try an AUTO mission.

I headed over to the local "park" - more like a remote muddy field that the county calls a park - to fly my quad.  The plan was to check out AUTO mode with the program shown in the previous blog entry.  I forgot, or ignored the previous tests that showed that LOITER mode did not work well, the copter bobbed up and down and did not hold position.

So I try taking off in AUTO mode with no luck, then do a manual takeoff and flip the switch for Auto mode.  At first, things seemed OK, then the quad headed for the river, gaining altitude.  Before I could react, it was over the Potomac at about 75 feet, then it dipped below the tree line and I could not see it.  I flipped back to manual (Stabilize) control and thought "that quad is gone".  I hit the throttle to try and bring it back up above the trees and it appeared as a little speck in the distance.  I then was able to bring it back with some skillful (lucky) stick work and land it.  Was I ever lucky!

The saving grace is that it took some great video footage while on its semi-controlled mission.  Also, this is why you should not fly near people, as this could happen to you and someone could get hurt.

Here is the video:

Saturday, April 11, 2015

Back Up and Running


My Deadcat SK450 is back running and as well as ever, the youtbe proof is above.  The modifications I made:


  1. Replaced 3DR Pixhawk and GPS with Hobbyking Micro APM and no-name GPS.
  2. Removed 3DR power monitoring module.
  3. Used Spektrum DX6i radio and DX610 receiver.
  4. New landing gear shock absorbers (see picture).
The finished unit is shown below:

Reconstructed Quad

The other mods are shown in the following pictures:


Friday, March 27, 2015

Putting Pixhawk aside

Micro APM mounted on standoffs on plywood base

Wider view

After many days of debugging Pixhawk problems with ESC calibration, channel mapping, poor stability.. I put it aside and went back to an APM 2.7 unit for the SK450 dead cat.  The pixhawk seems like a nice unit, but the factory support was mediocre, the warranty is 3 months, and it seems pretty finnicky about ESCs, powering, and such.  Online support from forums is usually helpful but not always and not in this case.

Removing the Pixhawk was reasonably easy but the APM was a pain as it is a micro unit and is not nicely packaged.  I mounted it on standoffs as shown and replaced the GPS with a known good unit as well, let's see what happens.

Thursday, February 12, 2015

New Quadcopter Build: SK450 Dead Cat

Now that we are back from Florida and parts have arrived, it is time to start the new build.  I salvaged whatever I could from the Flying Flowerpot (may it rest in peace).  Two motors, the four speed controls, battery, flight control, receiver, and camera were all salvageable.  However, I decided to replace some of these parts and to change the configuration of the quadcopter to "Dead Cat" - a non-square quad setup with more room for cameras.  See the picture below for the basic setup, not fully assembled.

The other changes that I plan to make are:

  • New flight control system (Pixhawk) with more accurate GPS (LEA-6H).  I bought the genuine 3DR versions instead of the Chinese clones to ensure quality.  My old APM 2.6 system was a Chinese clone and had limitations and unknown quality.
  • New receiver (Spektrum AR610).  This receiver is highly regarded compared to the Orange R615X, which has rumors of range issues.  New Spektrum DX6i transmitter.
  • Use of a PCB as a frame to distribute battery power, bought from Hobbyking.
  • Dead Cat configuration using a conversion kit from Hobbyking.  I made a mistake and assumed that all I needed was the previously mentioned SK450 Dead Cat PCB, but it turns out that you need this plus the Dead Cat conversion kit.
  • Full monitoring of power by the control system.  This was included with the Pixhawk.
  • A proper cover instead of a flower pot, sourced from Quadrysteria.com.
  • Receiver power from the Pixhawk or separate UBEC, not from the ESC's.  This should be higher quality power with less interference.
  • Use of loctite on all screws to reduce the chance of loosening with vibration.
  • Carbon fiber props.
The new control and radio system are shown below.


Tuesday, December 16, 2014

Rebuilding The Flying Flower Pot Quadcopter - The Six Million Dollar Man

Partially Rebuilt Flying Flower Pot (Pot removed for clarity)
One of the advantages of building your own quadcopter is that you know how to fix it if it breaks, and you can make improvements at the same time.  It is kind of like the Six Million Dollar Man TV series:   "We can rebuild him. We have the technology. We can make him better than he was. Better, stronger, faster."  The Flowering Flowerpot, after its last flight and crash (see previous blog post), needs this treatment.

First, I got rid of the battery monitoring module, which might be causing problems and I cannot figure out how to use it.

Second, I rewired the control module (APM) to receiver wiring to get rid of the servo extension cables and labeling.
Rewiring, receiver is on the left
Third, I repaired the damage to the quadcopter - a broken arm and a broken motor mount on the end of another arm using 5 minute epoxy, which smells like crap and gets everywhere.


Broken motor mount

Break in arm
Fourth, I got rid of the structure holding the GPS and compass and mounted them using nylon standoffs on the third level.
GPS remounted
Fifth, I removed the long landing gear and mounted the camera on top.  The long landing gear seem to cause a lot of damage in crashes.
camera mount
I also ordered a bunch of spare parts (arms, motor mounts, landing gear..).  Stay tuned for more updates as we get the Pot ready for its next adventure.


Monday, December 8, 2014

Some Tips from the Meetup

I learned a few things at the Meetup that I will pass along.

  • Flying with larger propellers will make your video smoother but make the quadcopter less maneuverable.  I have 10 inch props on my homebuilt but I could go to 12 inches.
  • You cannot assign a separate channel to the AUTO function on your APM which triggers an autonomous mission.  AUTO is just a flight mode so it must be controlled by the same channel that allows you to use Stabilize or Loiter.  That was one of my questions that I got answered.
  • There is a capability called "OpenTX" that allows you to program inexpensive radios to do almost anything.  The radio is the 9X which is available branded Turnigy, Flysky, etc. and costs $50 or so.  You can also add a board inside the transmitter to allow USB hookup, it is from Smartieparts and cost about $20.
  • You can get plans to print a quadcopter frame using a 3D printer.