Showing posts with label Orange R615X. Show all posts
Showing posts with label Orange R615X. Show all posts
Wednesday, February 25, 2015

Thursday, February 12, 2015
New Quadcopter Build: SK450 Dead Cat
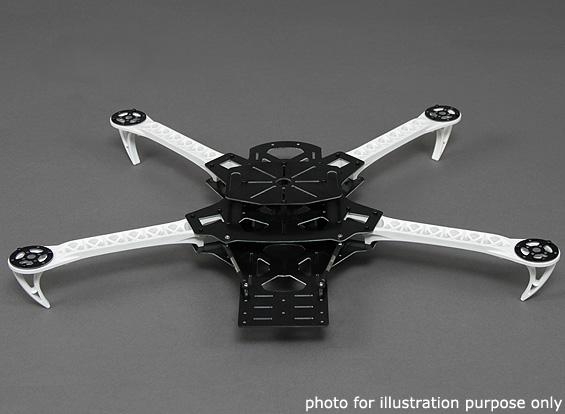
Now that we are back from Florida and parts have arrived, it is time to start the new build. I salvaged whatever I could from the Flying Flowerpot (may it rest in peace). Two motors, the four speed controls, battery, flight control, receiver, and camera were all salvageable. However, I decided to replace some of these parts and to change the configuration of the quadcopter to "Dead Cat" - a non-square quad setup with more room for cameras. See the picture below for the basic setup, not fully assembled.

The other changes that I plan to make are:

- New flight control system (Pixhawk) with more accurate GPS (LEA-6H). I bought the genuine 3DR versions instead of the Chinese clones to ensure quality. My old APM 2.6 system was a Chinese clone and had limitations and unknown quality.
- New receiver (Spektrum AR610). This receiver is highly regarded compared to the Orange R615X, which has rumors of range issues. New Spektrum DX6i transmitter.
- Use of a PCB as a frame to distribute battery power, bought from Hobbyking.
- Dead Cat configuration using a conversion kit from Hobbyking. I made a mistake and assumed that all I needed was the previously mentioned SK450 Dead Cat PCB, but it turns out that you need this plus the Dead Cat conversion kit.
- Full monitoring of power by the control system. This was included with the Pixhawk.
- A proper cover instead of a flower pot, sourced from Quadrysteria.com.
- Receiver power from the Pixhawk or separate UBEC, not from the ESC's. This should be higher quality power with less interference.
- Use of loctite on all screws to reduce the chance of loosening with vibration.
- Carbon fiber props.
The new control and radio system are shown below.
Tuesday, December 16, 2014
Rebuilding The Flying Flower Pot Quadcopter - The Six Million Dollar Man
 |
| Partially Rebuilt Flying Flower Pot (Pot removed for clarity) |
First, I got rid of the battery monitoring module, which might be causing problems and I cannot figure out how to use it.

 |
| Rewiring, receiver is on the left |

Broken motor mount
 |
| Break in arm |
 |
| GPS remounted |
 |
| camera mount |
Tuesday, December 2, 2014
Evaluation of Homebuilt Quadcopter Components
I put together a table with my evaluation of the components I used to build the quadcopter and the rough cost of the quadcopter: $320.
| Part | Source | Rating (1=best) | Approx cost | Comments |
| Hobbyking SK450 Glass Fiber Quadcopter Frame 450mm | Hobbyking | 1 | $20.00 | Well documented, rugged |
| TURNIGY Plush 25amp Speed Controller | Hobbyking | 1 | $13.00 | Well documented, works well, does not overheat, used 4 |
| Turnigy Multistar 2216-800Kv 14Pole Multi-Rotor Outrunner | Hobbyking | 1 | $16.00 | Works well, used 4 units |
| Hobby King Quadcopter Power Distribution Board | Hobbyking | 2 | $5.00 | Works well but hard to mount |
| Extended Landing Skid Set for SK450 Quadcopter Frame | Hobbyking | 2 | $11.00 | Works but a bit too flexible |
| Slow Fly Electric Prop 1045R SF | Hobbyking | 3 | $3.00 | Works, inexpensive, but prone to breakage |
| TURNIGY BESC Programming Card | Hobbyking | 1 | $5.00 | Well documented, works well |
| Turnigy 2200mAh 3S 20C Lipo Pack | Hobbyking | 1 | $10.00 | Good power delivery, good value |
| OrangeRx R615X DSM2/DSMX Compatible 6Ch 2.4GHz Receiver w/CPPM | Hobbyking | 1 | $10.00 | Works well, good value, compatible with Spektrum DX4i Transmitter |
| HobbyKing HKPilot Mega Mini Combo Flight Controller GPS and Power Module | Hobbyking | 4 | $120.00 | Flimsy USB, poor documentation |
| 5" (inch) Travel Micro USB Cable, Twin Pack Cables | Amazon | 1 | $10.00 | Great way to protect USB on APM |
| Hobbypower Top Pin APM2.6 External Compass APM Flight Controller w/ UBLOX NEO-6M GPS | Amazon | 2 | $70.00 | Works great, great value, no documentation |
| Tenergy 1-4 Cells Li-PO/Li-Fe Balance Airsoft Battery Charger | Amazon | 1 | $20.00 | works great, great value |
| 2 of NEEWER® 3.5mm Gold Plated Bullet Banana Plug Connector for RC Battery 10-Pairs | Amazon | 1 | $7.00 | Works well, used 2 packs |
| Dowels, screws, glue, velcro, flower pot | Home Depot | 1 | $25.00 | Cheaper than hobby store |
| Total cost of built unit (not including broken Hobbyking Controller) | $319.00 |
Thursday, October 30, 2014
Building Quadcopter Part 3
 |
| Photo 1: Frame Top View |
 |
| Photo 2: Frame bottom view |
 |
| Photo 3: Frame side view |
Making progress on the build. I have assembled the basics of the SK450 frame (see the first 3 photos) and you can see that it has 3 levels for mounting electronics, sensors, battery, camera, and radio. I am currently "dry-fitting" components to see what should go where. Instructions are few and far between, usually a few pages written in Chinglish. For Example: the Wiring document is called "HK Mini APM Wiring Helps". The current plan is:
- Top level: sensors, controller
- Second level: receiver, maybe controller
- Third level: power distribution
- Hanging from bottom: battery, camera
- Mounted on each arm: speed control
I also received the receiver, controller and sensor kit from Hobbyking, which is very small, see photo 4. The AAA battery is just so you can judge the size. The controller came from Hong Kong but only took about 8 days to arrive with no duty payable (gotta love the USA).
 |
| Photo 4: 6 channel receiver and Flight Controller |
Subscribe to:
Posts (Atom)