Showing posts with label build. Show all posts

Saturday, May 16, 2015

Balancing a Quadcopter

After a short break, I am back to working on the Deadcat SK450 quad.  One thing I am learning is that balancing the quadcopter is important.

Model aircraft are very sensitive to their point of balance, but I did not realize quadcopters had a similar tendency.

If your quadcopter, properly calibrated with the trims set at 0, tends to go forward or backward slowly after takeoff in Stabilize mode, you are likely nose (forward movement) or tail (backward) heavy.  If your quadcopter is not symmetrically built (left to right across the centerline), you could also see a consistent movement left or right.

The solution is to move equipment to counteract the imbalance.  The battery is usually the easiest thing to move.  The process is like this:

  1. Take a short test hop inside or in very calm winds and note which way the quad wanders.
  2. Move the battery back if you wander forward, or move the battery forward if you wander backward.  Mark the battery's new position with masking tape.  See figure 2 for battery installation (farthest to rear) on my quadcopter when camera is installed.
  3. Try another test hop, see if the quad will hover in one place.  If yes, the balance is OK.
  4. If it still wanders, move the battery as in step 2. and also move the tape.   Take a test hop, see if it is fixed.  Repeat until you get a nice stable hover, something like you see in the video below.  My problem was the quad moving forward consistently, which is now fixed, it still moves from side to side due to my clumsy control inputs.
  5. Once you have the battery in the right spot, leave the tape in place and mark it so you know where to put the battery next time.  See figure 1.
Figure 1 Tape markings for different quad configurations

Figure 2 Battery installed in camera configuration

You may have to do this for different configurations, like with and without camera, so you would have two markings for where to put the battery.

Don't add weight to get a balance unless you really have to.  Adding weight just decreases flight time and dynamic stability.


Saturday, February 21, 2015

Test Flight Successful

Finished the basic build of the quad and was able to get a quick successful test flight in the basement after about 5 hours of messing around with the quad, my radio, and Mission Planner.

Finally worked out all the little issues and had a successful test flight:

  1. The Deadcat needed to be balanced as it was naturally nose heavy.  Moving the battery allowed me to balance the quad.
  2. I played around with ESC calibration and radio settings for hours because the props kept spinning when I armed the quad.  My old APM equipped quad did not do this.  Well it turns out that the default for Mission Planner with Pixhawk is to make the blades spin slowly when armed.  I did manage to program the ESCs to play tunes when they power on, but that is not much use.
  3. Turning on the throttle failsafe is a waste of time as it is triggered as soon as you arm the quad, causing the arm function to fail.
  4. Use loctite on all bolts, the one place that where it was skipped (landing skids), a bolt came loose.
  5. Need to make up a cheat sheet with the meaning of all Pixhawk and ESC sounds and lights.  It is hard to understand failures otherwise.
  6. Had to reverse all the RC channels except throttle.
  7. It seems smoother than the last quad as the props are balanced but it is more twitchy on the controls, so will have to do some more tuning.

Wednesday, February 18, 2015

Design Choices

Spent the last few days working through some design choices and doing some preparation work while waiting for parts.

1. I balanced all the props using the technique in this great video:

2. I soldered the battery connections on the bottom of the Deadcat PCB.  I did this by removing the paint or mask over the power and ground planes and soldering to the exposed copper.

3. Setting up the radio exposed some problems.  The Spektrum DX6i transmitter (left) that I planned to use is not ideal for quadcopters as it has only two position switches for the extra channels, while my old DX4e transmitter (right) has a handy 3 position switch which can be used to set flight modes (Stabilize, loiter, auto).  Easy to fix, use the DX4e right?  Not so fast, I got some help from a Spektrum radio developer on the RCUniverse website and I found out that the DX4e has half the power output of the DX6i!  So I may use the DX6i and fiddle with the mixing function to get more flight modes.

4. Need to reduce vibrations for the flight control system so I bought some Kyosho gel tape from Amazon.com.

I am still waiting for some critical parts - the PPM mixer for the AR610 receiver (on the boat from China), the new video camera (same source, different boat), FPV monitor (ditto).  Stay tuned for further updates.

Thursday, February 12, 2015

New Quadcopter Build: SK450 Dead Cat

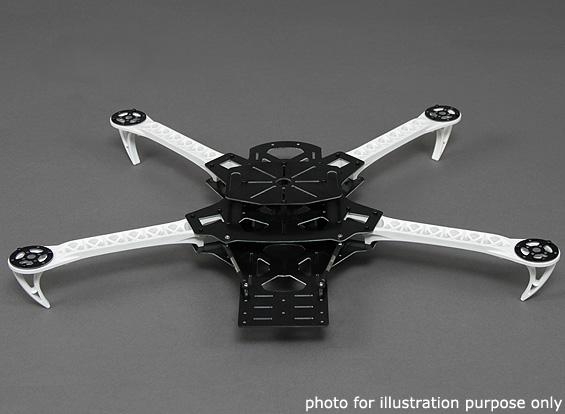
Now that we are back from Florida and parts have arrived, it is time to start the new build.  I salvaged whatever I could from the Flying Flowerpot (may it rest in peace).  Two motors, the four speed controls, battery, flight control, receiver, and camera were all salvageable.  However, I decided to replace some of these parts and to change the configuration of the quadcopter to "Dead Cat" - a non-square quad setup with more room for cameras.  See the picture below for the basic setup, not fully assembled.

The other changes that I plan to make are:

  • New flight control system (Pixhawk) with more accurate GPS (LEA-6H).  I bought the genuine 3DR versions instead of the Chinese clones to ensure quality.  My old APM 2.6 system was a Chinese clone and had limitations and unknown quality.
  • New receiver (Spektrum AR610).  This receiver is highly regarded compared to the Orange R615X, which has rumors of range issues.  New Spektrum DX6i transmitter.
  • Use of a PCB as a frame to distribute battery power, bought from Hobbyking.
  • Dead Cat configuration using a conversion kit from Hobbyking.  I made a mistake and assumed that all I needed was the previously mentioned SK450 Dead Cat PCB, but it turns out that you need this plus the Dead Cat conversion kit.
  • Full monitoring of power by the control system.  This was included with the Pixhawk.
  • A proper cover instead of a flower pot, sourced from Quadrysteria.com.
  • Receiver power from the Pixhawk or separate UBEC, not from the ESC's.  This should be higher quality power with less interference.
  • Use of loctite on all screws to reduce the chance of loosening with vibration.
  • Carbon fiber props.
The new control and radio system are shown below.


Sunday, December 21, 2014

RIP Flying Flowerpot

Pre Flight

The Flying Flowerpot has gone to the great beyond, aka the garbage bin.  It was a great first drone to build, I learned a lot, but it had its share of problems.

For the last flight, I programmed it via Mission Planner to fly a rough polyhedron at 60 feet over the River Mills Park near the Potomac River.  It accomplished this and then loitered.  When I switched it back to Stabilize mode, it somehow became unstable and did a death dive.  This broke the internal frame, two arms, two propellers, one motor, the battery mount, and the flower pot.   The basic electronics are fine, but I will have to get a new frame kit and motor at least.  The video is below.

The new build will take some time, so postings may be sporadic.  Have a Merry Christmas and a Happy New Year and Happy Hannukah.


Wednesday, December 17, 2014

Flying Flowerpot 2.0 -- SK450 Quadcopter Rebuilt

Flying Flowerpot 2.0

I finished the Flying Flowerpot quadcopter rebuild and had a successful basement test flight in the new configuration.  Changes since the last blog posting:

  1. Moved the camera mount again, to the upper level but with a new mounting bracket so the camera is out front between the props.
  2. Moved the receiver slightly.
  3. Tidied up the wires.
The following photos show the Flying Flowerpot 2.0:
Top view, no flower pot
Note the receiver attached to top level with double sided foam tape
New camera mount
Front view
Rear View

Tuesday, December 16, 2014

Rebuilding The Flying Flower Pot Quadcopter - The Six Million Dollar Man

Partially Rebuilt Flying Flower Pot (Pot removed for clarity)
One of the advantages of building your own quadcopter is that you know how to fix it if it breaks, and you can make improvements at the same time.  It is kind of like the Six Million Dollar Man TV series:   "We can rebuild him. We have the technology. We can make him better than he was. Better, stronger, faster."  The Flowering Flowerpot, after its last flight and crash (see previous blog post), needs this treatment.

First, I got rid of the battery monitoring module, which might be causing problems and I cannot figure out how to use it.

Second, I rewired the control module (APM) to receiver wiring to get rid of the servo extension cables and labeling.
Rewiring, receiver is on the left
Third, I repaired the damage to the quadcopter - a broken arm and a broken motor mount on the end of another arm using 5 minute epoxy, which smells like crap and gets everywhere.


Broken motor mount

Break in arm
Fourth, I got rid of the structure holding the GPS and compass and mounted them using nylon standoffs on the third level.
GPS remounted
Fifth, I removed the long landing gear and mounted the camera on top.  The long landing gear seem to cause a lot of damage in crashes.
camera mount
I also ordered a bunch of spare parts (arms, motor mounts, landing gear..).  Stay tuned for more updates as we get the Pot ready for its next adventure.


Monday, December 15, 2014

Make Sure Everything is Tightened


Had a crash yesterday with some damage.  Nothing serious and I was able to repair it quickly.  The "Flying Flower Pot" seems quite robust.  The problem was a propeller that came loose, causing the quadcopter to fall from about 20 feet to the pavement.  I then checked all the bolts and screws and found a few that were getting loose due to the vibration, so check your quad before every flying session.

Monday, December 8, 2014

Some Tips from the Meetup

I learned a few things at the Meetup that I will pass along.

  • Flying with larger propellers will make your video smoother but make the quadcopter less maneuverable.  I have 10 inch props on my homebuilt but I could go to 12 inches.
  • You cannot assign a separate channel to the AUTO function on your APM which triggers an autonomous mission.  AUTO is just a flight mode so it must be controlled by the same channel that allows you to use Stabilize or Loiter.  That was one of my questions that I got answered.
  • There is a capability called "OpenTX" that allows you to program inexpensive radios to do almost anything.  The radio is the 9X which is available branded Turnigy, Flysky, etc. and costs $50 or so.  You can also add a board inside the transmitter to allow USB hookup, it is from Smartieparts and cost about $20.
  • You can get plans to print a quadcopter frame using a 3D printer.

Sunday, December 7, 2014

DC Area Drone User Group Meetup


I went to a "Meetup" of the DC Area Drone User Group yesterday.  It is essentially an informal meeting of like-minded individuals organized through the Meetup application.

The meeting was very useful as we had a great mix of beginners like me, experienced folks, large drones, small drones, different radio setups, etc.  I was able to ask questions of some of the experienced folks about how to set up my controller and radio, what props to use, where to buy parts, etc.  There was also an opportunity to see what other people had done with their drones - construction techniques, equipment, and so on.  You also get to meet people and exchange contact information.

If your community has a similar club or users group, I encourage you to attend as it is a great way to meet folks, get questions answered, and learn.

Tuesday, December 2, 2014

Evaluation of Homebuilt Quadcopter Components

I put together a table with my evaluation of the components I used to build the quadcopter and the rough cost of the quadcopter: $320.

PartSourceRating (1=best)Approx costComments
Hobbyking SK450 Glass Fiber Quadcopter Frame 450mmHobbyking1$20.00Well documented, rugged
TURNIGY Plush 25amp Speed ControllerHobbyking1$13.00Well documented, works well, does not overheat, used 4
Turnigy Multistar 2216-800Kv 14Pole Multi-Rotor OutrunnerHobbyking1$16.00Works well, used 4 units
Hobby King Quadcopter Power Distribution BoardHobbyking2$5.00Works well but hard to mount
Extended Landing Skid Set for SK450 Quadcopter FrameHobbyking2$11.00Works but a bit too flexible
Slow Fly Electric Prop 1045R SFHobbyking3$3.00Works, inexpensive, but prone to breakage
TURNIGY BESC Programming CardHobbyking1$5.00Well documented, works well
Turnigy 2200mAh 3S 20C Lipo PackHobbyking1$10.00Good power delivery, good value
OrangeRx R615X DSM2/DSMX Compatible 6Ch 2.4GHz Receiver w/CPPMHobbyking1$10.00Works well, good value, compatible with Spektrum DX4i Transmitter
HobbyKing HKPilot Mega Mini Combo Flight Controller GPS and Power ModuleHobbyking4$120.00Flimsy USB, poor documentation
5" (inch) Travel Micro USB Cable, Twin Pack CablesAmazon1$10.00Great way to protect USB on APM
Hobbypower Top Pin APM2.6 External Compass APM Flight Controller w/ UBLOX NEO-6M GPSAmazon2$70.00Works great, great value, no documentation
Tenergy 1-4 Cells Li-PO/Li-Fe Balance Airsoft Battery ChargerAmazon1$20.00works great, great value
2 of NEEWER® 3.5mm Gold Plated Bullet Banana Plug Connector for RC Battery 10-PairsAmazon1$7.00Works well, used 2 packs
Dowels, screws, glue, velcro, flower potHome Depot1$25.00Cheaper than hobby store
Total cost of built unit (not including broken Hobbyking Controller)$319.00

Monday, December 1, 2014

Flying The Quadcopter


The Quadcopter is flying well.

Yesterday I had some successful flights (see video above) but one crash landing that required some repairs - nothing major - a couple of new propellers and reattaching the GPS mount with glue.

Today I had some great flights in a park by the river with fabulous panoramic views under clear blue skies with little wind, but the camera stopped working so there is no footage.  I also tried the althold and loiter functions and they worked like a charm.

I am getting about 10 minutes of flying time with a 2200mah battery pack and I have ordered a 3000mah pack as a spare.  They take a while to recharge (a few hours).

Wednesday, November 26, 2014

Quadcopter Build - Photos of Finished Drone

The flower pot was the best cover I could find and the bungee cords hold it to the drone

Note the hole so the Controller LEDs are visible

You can see the Vuho camera beneath the drone

Bottom view

Battery mount and USB extender connector which also protects against controller USB damage

Camera mount with battery behind

Love that flower pot!

Tuesday, November 25, 2014

First Flights with Camera


I managed to get some quadcopter test flights done with my Veho VCC-005 action camera attached, both indoors and outdoors.  You can see the results in the attached Youtube video.  I also checked out the Loiter and Althold modes by triggering them from the transmitter while in flight and they seemed to work well.

Why Quadcopter-Drones are a Good Hobby for Me

The other day I reflected on why building and flying a quadcopter is an interesting hobby for me.  It is pretty straightforward, to my mind.  Two of my other hobbies that I started when I was young were personal computers and model building.  Drones combine these two together since you build the drone and program and interface it with a computer.  There is also a bit of photography thrown in, which is another hobby of mine.  I have other hobbies that are not conducive to drones like wine-drinking so we will not add those to the mix.

Monday, November 24, 2014

Lessons from First Quadcopter Build

I learned a few things from building my first quadcopter drone.

  1. The USB port is very fragile, attach a permanent short extender cable to connect to your PC.  Otherwise, you will be buying a new controller.
  2. You need to take time to think as you assemble the drone.  There are lots of ways of attaching components and taking some time to think will yield a better result.  Spending time with the Mission Controller application will help you set up your drone, understand how it will work, and allow you to test some of the functions before flying.
  3. The best places to get pieces are online stores like Amazon and Hobbyking, Home Depot, and your local hobby shop.
  4. Nylon cable ties are a great way to attach things to the quadcopter frame.  Why use bolts when a simple tie will do?
  5. Learn how the controller works before flying.  There are some modes like "althold" that sound useful but should only be triggered after flying.
  6. Make a tethered test setup to test fly your quad.
  7. Use the Wiki, google, youtube, and manufacturers sites to find solutions to problems or helpful tutorials.
  8. Get a good soldering iron and learn to solder.

Sunday, November 23, 2014

Building and Free-Flying Quadcopter Part 13


Time to see if the quadcopter really flies.  You can see the successful test flight in the basement above, but the lighting is not great and Youtube has further degraded the quality to potato-camera level.  The quad flies well but is a bit sensitive to throttle and needed some work on securing the battery.  The not so smooth flying technique is the pilot's fault as I was trying to keep it away from the ceiling.  The hovering is pretty good and the next step will be some test flights outside when there is no wind.

Friday, November 21, 2014

Building and Flying Quadcopter Part 12


Well I went back and tried to fix the problems in the last test flight, which were:

  1. ESC's not properly calibrated - I was able to get them to calibrate once, but there is something weird about how these speed controls interface with the controller.
  2. Poor throttle control - It turns out that you should land and take off in "stabilize mode" and I was in "Althold" mode.  It took a lot of google searching to stumble across this.
  3. The receiver refused to work for a while and I don't know why.  After plugging and unplugging wires, disassembling the receiver, testing and testing, it started to work again for some unknown reason.
After fixing these issues, I tried the quadcopter with no props and it seemed better.  I then lengthened the tethers and ran another test flight shown above, which seems much better.

Wednesday, November 19, 2014

Building and Flying Quadcopter Part 11

Quadcopter Drone ready for tethered test flight


Making progress, I found the link to set up the motors, speed controls, etc and got the wiring for the ESCs and motors set up properly.  Then I mounted the propellers and spent a while trying to figure out how to arm the drone, which I found at this link on the wiki.

I also needed a way to test-fly the drone, given my propensity to crash quadcopters.  I came up with a system using an old piece of plywood, with holes to allow rope to be attached to the drone landing gear.  The rope is wrapped around some tall screws on the plywood to allow adjustment.  This is shown in the photo above and actually worked out well.

Then our first test flight shown above.  The drone worked, although the controls need adjustments, particularly the throttle.  You can see me testing throttles, forward motion, yaws left and right, and left and right movement - all the basic movements.  So now it is back to the wiki and Mission Planner to find out how to tune the controls.


Tuesday, November 18, 2014

Building Quadcopter Part 10


Further Progress.  I reloaded Mission Planner onto my laptop and it seems to work with the controller now.  The rats' nest of wiring is somewhat tamed and the receiver and controller are mounted using double sided foam tape (get it at Home Depot where they call it "mounting tape").  The extended landing gear are installed and I found an appropriate non-metallic shell to cover the electronics.  Yes, it is a 6 inch flower pot, and it is perfect for the job.